In Patch Release 8.0.1 R2024-07 Talend introduced native product support for JWT (JSON Web Token) validation, fulfilling a long-standing feature request. This new functionality significantly enhances security by enabling OIDC (OpenID Connect) / OAuth2 integration with REST services developed in Talend Studio. Prior to this update, Talend only supported outdated or non-interoperable authentication mechanisms:
- Basic Authentication: Known for its weak security, as credentials are sent in an easily decodable format.
- Proprietary SAML Token Authentication: While secure, it lacked interoperability with common standards and external identity providers.
- Misleading "Open ID Connect" Support: Despite the name, Talend's OIDC support was actually a custom OAuth2 implementation using the outdated "Resource Owner Password Credentials" (ROPC) grant type. ROPC is no longer recommended due to inherent security vulnerabilities, as it requires direct handling of user credentials.
With the introduction of JWT token validation, Talend now supports modern, robust security integrations. This allows for seamless authentication using external identity providers like Azure Entra ID or Keycloak, empowering users to authenticate against these providers and retrieve a signed JWT token tied to a specific service.
What is JWT?
JWT (JSON Web Token) is an open, industry-standard method (RFC 7519) for securely transmitting information between parties as a JSON object. It's widely used for authorization and information exchange in modern web applications, particularly in OIDC and OAuth2-based security systems.
JWTs are compact, URL-safe tokens that consist of three parts:
Header: This part typically consists of two fields: the type of token (JWT) and the signing algorithm being used (e.g., HMAC SHA256).
Payload: The payload contains the claims. Claims are statements about an entity (typically, the user) and additional metadata. There are three types of claims:
- Registered claims: Standard claims like
iss(issuer),exp(expiration time),sub(subject), etc. - Public claims: Custom claims that can be defined in your own application context.
- Private claims: Claims agreed upon by both parties, generally used for sharing specific details between the client and the server.
- Registered claims: Standard claims like
Signature: The signature is used to verify the token wasn’t tampered with. It's created by signing the header and payload with a secret (or private key) using the specified algorithm.
When a JWT is generated, it typically looks like this: eyJhbGciOiJIUzI1NiIsInR5cCI6IkpXVCJ9.eyJzdWIiOiIxMjM0NTY3ODkwIiwibmFtZSI6IkpvaG4gRG9lIiwiaWF0IjoxNTE2MjM5MDIyfQ.SflKxwRJSMeKKF2QT4fwpMeJf36POk6yJV_adQssw5c. This compact format makes JWT ideal for inclusion in HTTP headers and other parts of a request.
Benefits of JWT in Talend
Interoperability: JWT is widely adopted and interoperable with numerous modern identity providers, allowing Talend to integrate smoothly with services like Azure AD, Okta, Keycloak, and many more.
Enhanced Security: JWT offers a more secure approach to authentication than the methods previously supported by Talend. The token's structure ensures that user credentials are never exposed, and its digital signature prevents tampering.
Stateless Authentication: One of the key advantages of JWT is that it’s stateless, meaning the server does not need to maintain session data. This reduces overhead and makes JWT ideal for microservices or distributed environments.
Role-based Access Control (RBAC): JWT tokens often carry role-based information, enabling fine-grained access control within Talend projects and services.
Scalability: JWT’s stateless nature makes it well-suited for distributed systems and scalable cloud architectures, aligning with modern software practices.
How JWT Improves Talend’s OAuth2 Support
By supporting JWT token validation, Talend now complies with modern OAuth2 practices and OIDC standards. OAuth2 flows like Authorization Code Flow and Client Credentials Flow, which utilize JWT tokens, provide improved security and flexibility. These flows are widely adopted across cloud and enterprise environments.
This change enables developers to move away from legacy practices like Basic Authentication and ROPC, which are vulnerable to security risks, and to implement scalable, secure APIs using OAuth2-based authentication strategies.
Integrating Talend JWT Validation with Azure Entra ID
Azure Entra ID (formerly known as Azure AD) is a robust cloud-based identity management service that provides OAuth2 and OIDC support, making it an ideal candidate for integrating with Talend’s REST services.
Let's take the above use case as an example. A user wants to access a web portal. He uses OIDC to login to the portal. The portal can either reuse the provided access token to call a backend REST service, or authenticate with its own client credentials against the identity provider (IDP) to get an access token for the REST Service. The REST service validates the JWT access token and loads some data from a DB. The REST service needs to call a legacy SOAP service to perform some calculations based on the loaded data. To invoke the SOAP service the REST service needs to exchange the JWT token against a SAML token at the local STS. With the new features in Talend this scenario could be implemented. However in my blog I want to keep it a bit simpler and only focus on getting a JWT access token for my portal application to call a REST service which will validate the JWT access token. For this purpose I need to setup two applications in Azure. The frontend portal and my backend REST service.1. Register the backend REST service
First, you need to register your REST backend service as an application within Azure Entra ID.
- Sign in to Azure Portal and go to Azure Active Directory.
- Under Manage, select App registrations and click New registration.
- Provide a Name for the application (e.g., "Customer Service").
- Redirect URI can be left empty, as the users will only login to the frontend portal, but not to the backend REST service.
- Click Register to complete the process.
2. Configure API Permissions
As your talend service does not need to query the Azure Graph API to get additional user information, you can safely delete the existing “User.Read” permission.
3. Expose an API
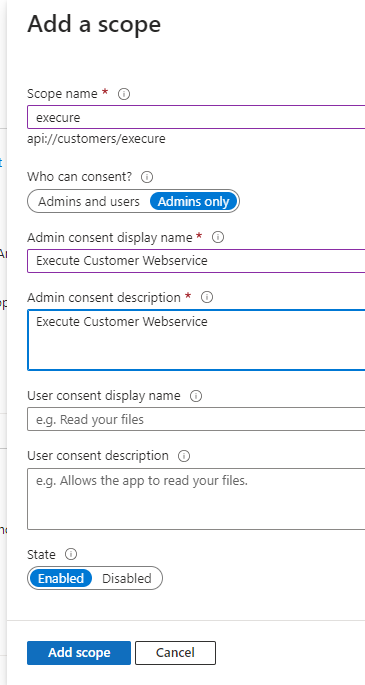
- Click on: Add a scope
- Define your scope name. E.g. execute
- Select who can consent this scope. E.g. Admins only
- Define your admin consent display name: E.g. Execute webservice
- Define your Admin consent description: Allows the app to execute my demo service
- If user consent was selected you need to define user consent settings as well, otherwise these fields can be left blank.
- State needs to be: Enabled
- Click on: Add scope
4. Restrict Access to Application
5. Register frontend web portal application
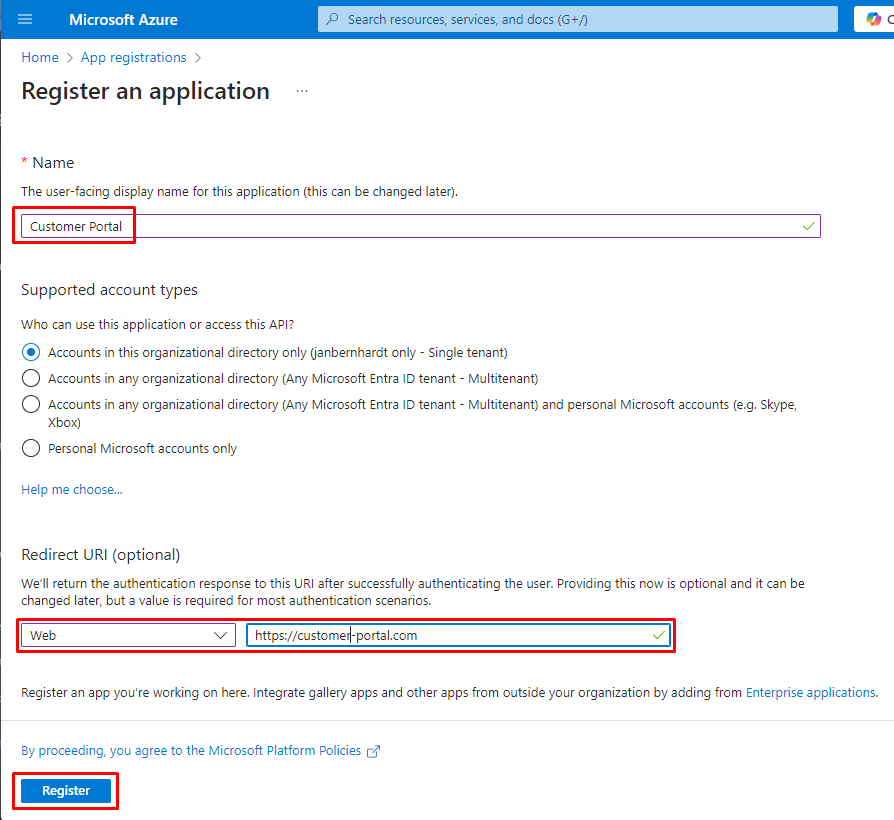
Next you need to register your frontend web portal as an application within Azure Entra ID.
- Under Manage, select App registrations and click New registration.
- Provide a Name for the application (e.g., "Customer Portal").
- Redirect URI should match with your portal OIDC endpoint, but can also be left empty for my demo case, as we are only using the application to get a JWT token from azure. We will not host an actual portal.
- Click Register to complete the process.
After registration:
- Take note of the Application (client) ID and as you'll need them later as the client_id of the client credentials OAuth2 flow.
- You can find the relevant Azure security URLs if you click on Endpoints on the top overview page. Here you will find the OAuth2 authorization endpoint as well as the token endpoint URL that is applicable for your application. These endpoints need to be used to request access tokens for your talend webservice.
- Under Certificates & secrets, create a new Client Secret and note this value as well.
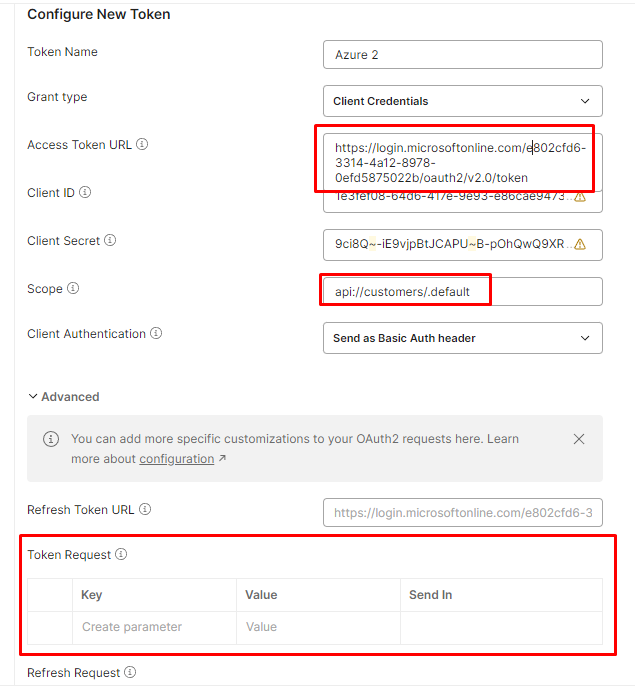
7. Fetch JWT token via Postman
- Create a new folder e.g. "Customers"
- Go to Authorization and setup your OAuth2 configuration
If you use token endpoint v1, the resource key needs to match with your REST service Application ID URI. If this value is not set, the issued token will not have the correct audience restriction, but will point to the Azure Graph API instead. (e.g. "00000002-0000-0000-c000-000000000000")
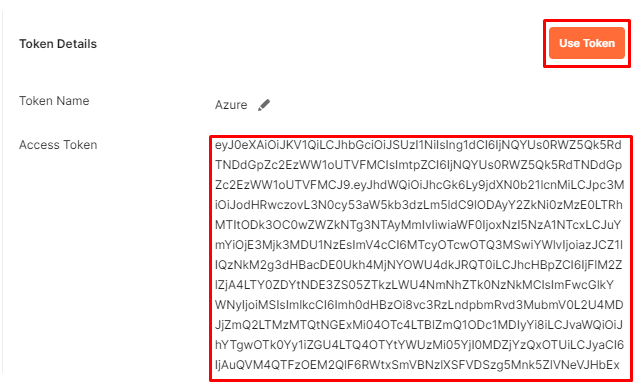
If you use token endpoint v2, the scope needs to match with your default service scope, and the resource key can be omitted: - You can review the token content by copy pasting it on jwt.io
8. Update Talend to Support JWT Token Validation
Now that you’ve registered your Talend service with Azure Entra ID, you need to configure JWT token validation in Talend to accept tokens issued by Azure.
In Talend Studio:
Add a REST service to your Talend job or microservice that will be protected by JWT validation.
Configure OAuth2 Settings: In Talend’s REST service settings, you need to enable OAuth2 and specify JWT validation.
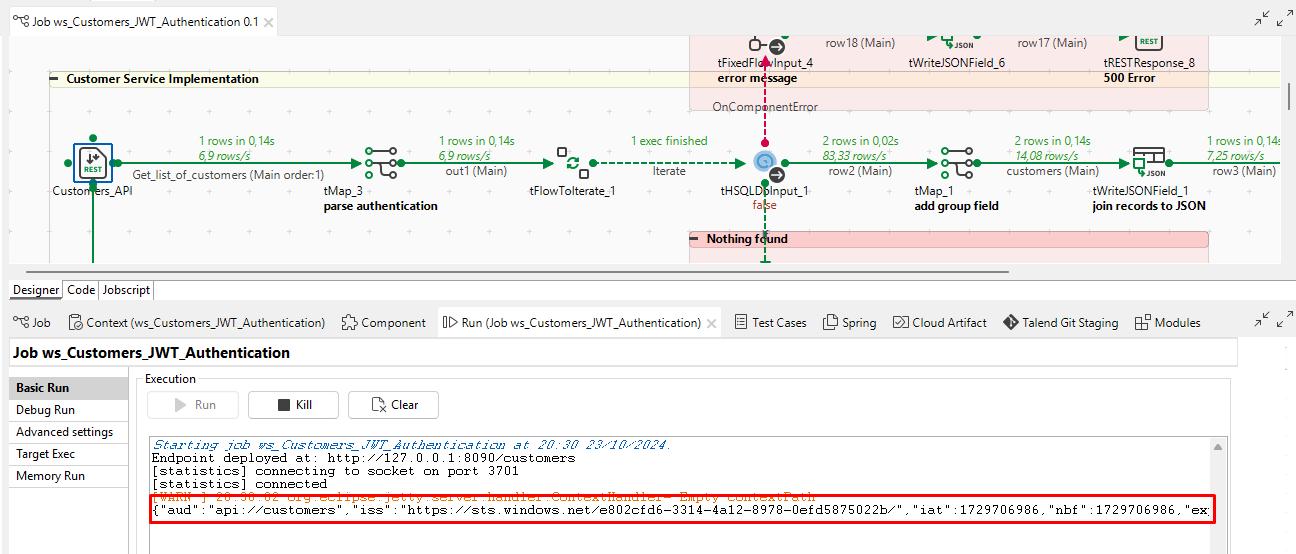
(Get_list_of_customers.Authorization != null
&& Get_list_of_customers.Authorization.toLowerCase().startsWith("bearer "))
? new String(java.util.Base64.getDecoder().decode(Get_list_of_customers.Authorization.substring(7).split("\\.")[1]), java.nio.charset.StandardCharsets.UTF_8)
: null
9. Test the JWT Validation
Now that everything is set up, you can test the JWT validation flow by obtaining a token from Azure Entra ID and using it to access your Talend REST service.
Test without a valid token
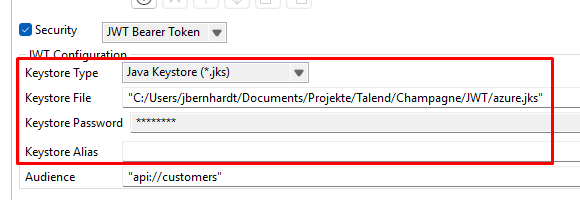
Therefore we need to import the certificates from the JWKS URL (https://login.microsoftonline.com/e802cfd6-3314-4a12-8978-0efd5875022b/discovery/v2.0/keys) into a java keystore and use this keystore instead.
- Copy certificates from URL into local text files:
- Use keytool commands or under Windows you can use the Keystore Explorer
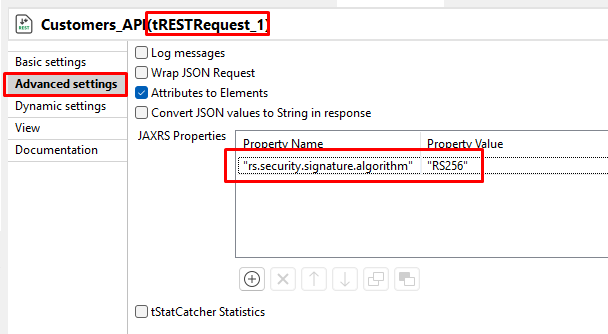
- Update the tRESTClient JWT configuration
10. Troubleshooting
- Invalid Token: Make sure the audience (client ID) and issuer (Azure token endpoint) are correctly set in Talend’s configuration.
- Expired Token: JWT tokens have an expiration (
expclaim). Ensure that the token hasn’t expired. - Signature Validation Failed: Ensure that the public keys for verifying the JWT signature are correct.
Conclusion
Integrating Talend’s new JWT validation feature with Azure Entra ID is a significant improvement for securing REST services. By leveraging Azure’s robust identity platform, you can ensure that only authenticated users or services can access your APIs, while benefiting from the scalability and security offered by JWT.











No comments:
Post a Comment